What is a crypto wallet?
A cryptocurrency wallet is a software application or piece of hardware that functions as a wallet for your cryptocurrency.
How do crypto wallets work?
Unlike the wallet used to store cash and cards, the crypto wallet does not store anything physical, it does not actually even ‘store’ your crypto, but it instead maintains the passkeys required for you to access your cryptocurrency.
Each crypto wallet is created with two keys: a public key (which is the wallet address) and the owners private key. Only the person who knows the private key can control the wallet and sign transactions. One of the great benefits of crypto is transparency. All public keys (wallets) are viewable online 24/7 so anyone can view the transactions taking place between wallets but only those with private keys can access the coins/tokens and carry out transactions.
There are a host of websites that offer a user interface to the transaction that take place on a blockchain. For example with https://etherscan.io/ you can view the transactions for all wallets on the Ethereum blockchain. Just navigate to the page and enter a public key in the search bar and you will see the amount of cryptocurrency in the wallet and a list of transactions. Test it out by copying and pasting in my public key: 0xF2fc936d42b03C9a236442E95Eb1E165646D7061
Sending and receiving cryptocurrency using a wallet is often fast, cheap, and easy to do. Typically all a person would need to do is enter the recipient’s address, specify the amount to be transferred, sign the transaction with their private key and pay a small transaction fee.
Different types of crypto wallet
There are two main types of crypto wallet: software wallets and hardware wallets.
An example of a software wallet is an app on your phone or a browser extension on your home computer that allows you quick access to view your account and sign transactions (e.g., send crypto) using your private key that no-one else can access. Software wallets are generally regarded as ‘hot’ wallets as they are connected to the internet.
A hardware wallet does the same job, but by contrast, it is a physical device much like a USB drive that is kept offline (‘cold’ wallet). Transactions could only be signed upon the device being connected to the internet.
There is no right or wrong crypto wallet and many crypto users utilise both.
How to set up a crypto software wallet
There are many software wallets available that you can download as a website browser extension or as an App on your phone. MetaMask, Phantom, Coinbase Wallet, Trust Wallet are examples of reliable and trustworthy wallets. For this example we will be utilising the MetaMask wallet.
METAMASK CRYPTO WALLET SETUP
- In your web Browser go to https://metamask.io/download/.
- To install the wallet as an extension to your browser select Install MetaMask for Chrome (alternatively you can select the Install for IPhone or Android options to install the app version on your phone).
- This will take you to the browser extensions page. Select Add to Chrome.

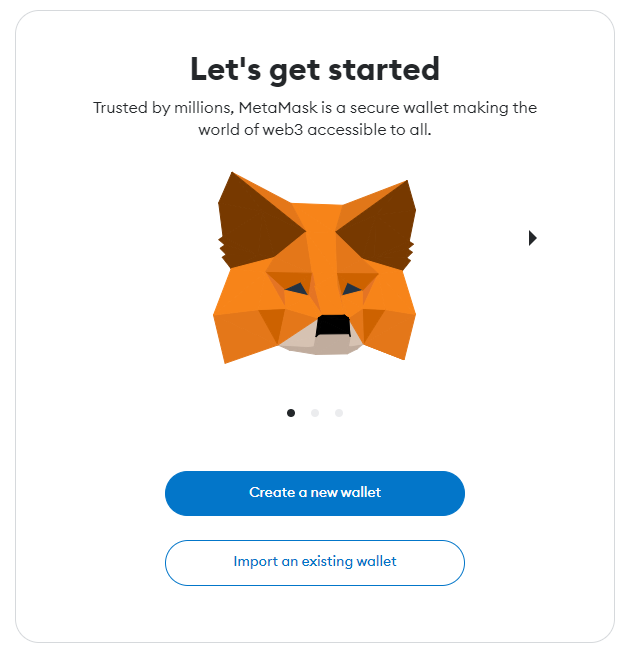
4. After installation of the extension is complete you will be shown the following screen which is the start of the 3-step process to creating your wallet. Click Create New Wallet.
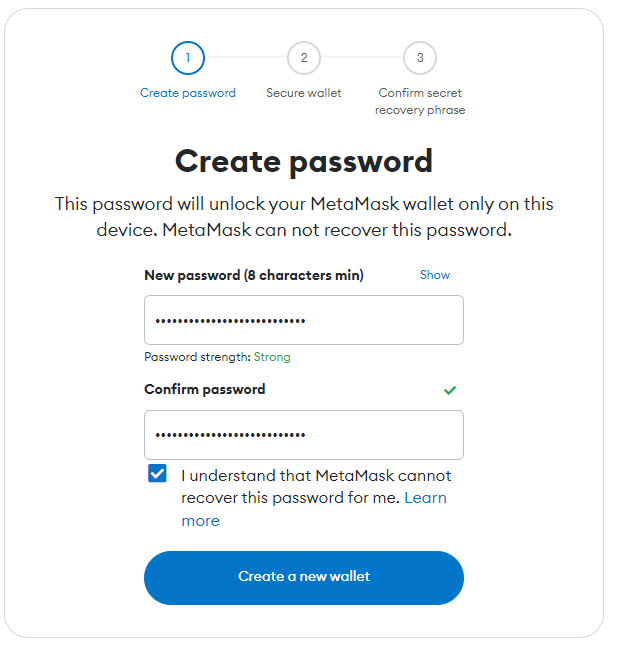
5. In step 1 you need to enter and confirm a password. The password will be used to unlock the MetaMask wallet on the device you are using. The password should be strong but easy to remember because it is not possible to recover the password if it is lost. After completion of password, select Create New Wallet.
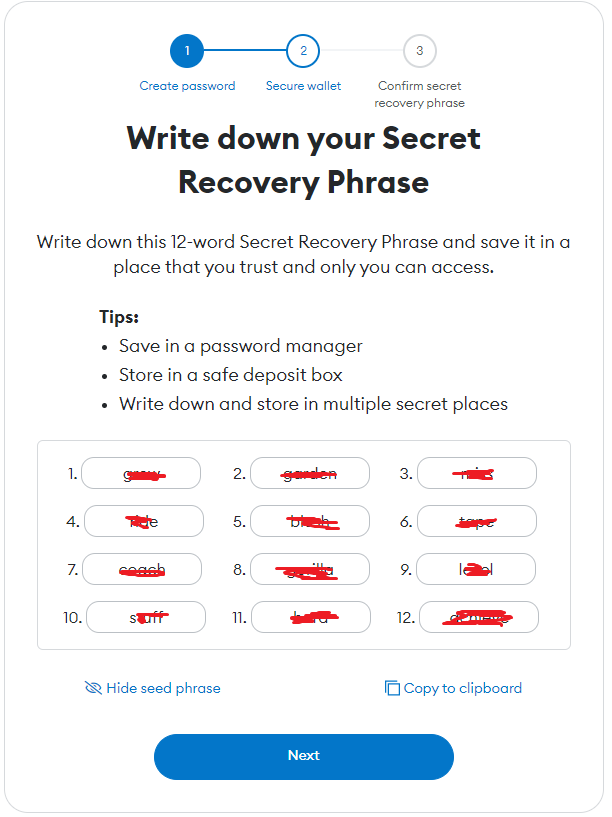
6. Next you will be prompted that you need to record your Secret Recovery Phrase. Your wallet security is maintained by the Secret Recovery Phrase – only those with access to this phrase has access to your wallet. If you ever want to reinstall the wallet on a different device or you switch computers and need to install the MetaMask extension again you will need this Recovery Phrase to connect to the wallet. It is imperative that you record this somewhere safe and secure. Click Reveal Secret Recovery Phrase to display the text you need to record.
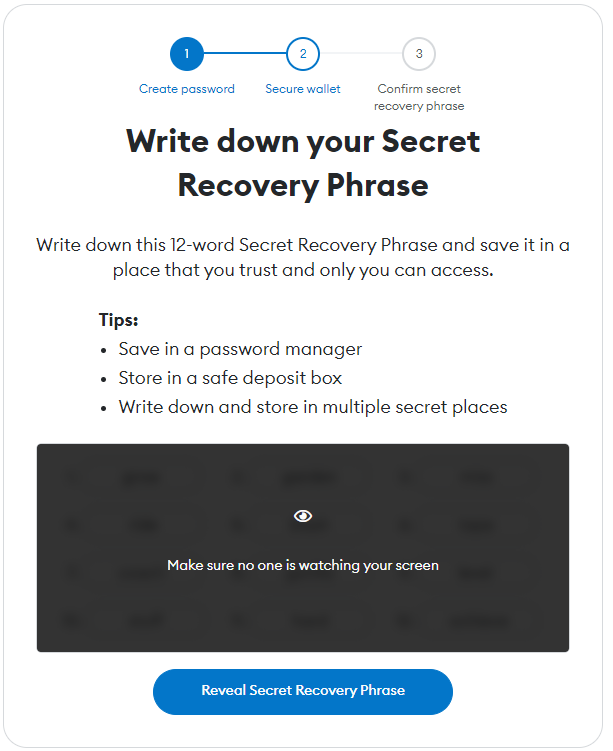
7. Once the Secret Recovery Phrase is revealed you can use the Copy to Clipboard option to store the key phrase somewhere secure online, e.g., in a password storage application.
Alternately you can write it down on paper and store somewhere safe. Click Next.
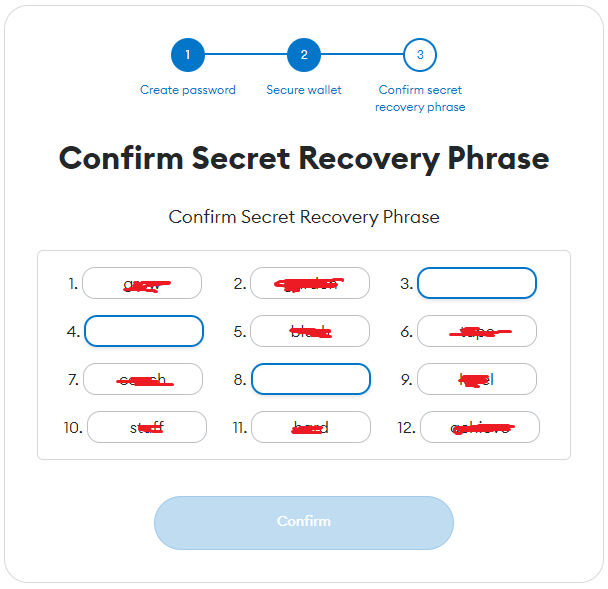
8. You will be asked to confirm three words from your secret recovery phrase. Once entered, click Confirm.
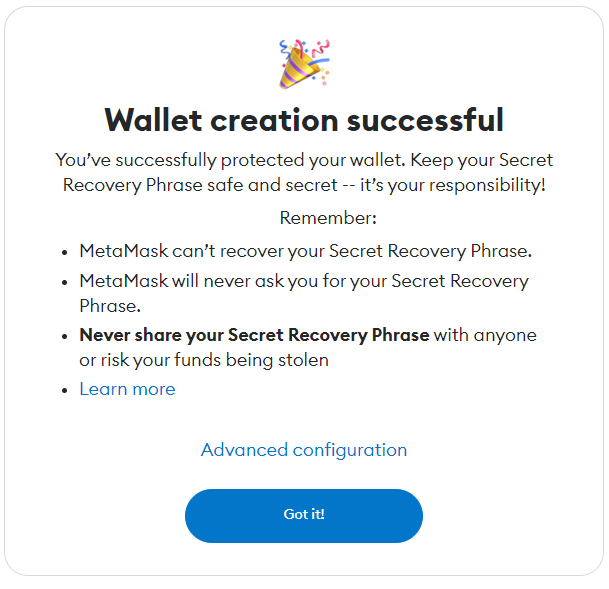
9. Wallet creation is now complete! Click Got it! to proceed and view your new wallet.
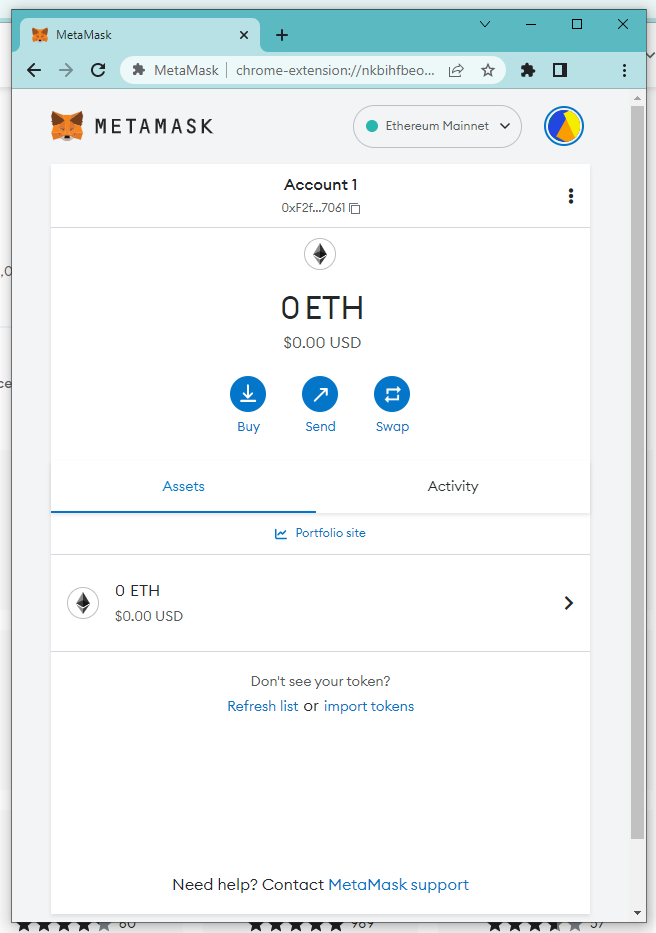
10. After completion the wallet will open automatically and you will be presented with the following page which is your empty crypto wallet!
navigating around Your crypto wallet
We’ve broken the MetaMask wallet interface down into four key areas.
METAMASK WALLET INTERFACE EXPLAINED

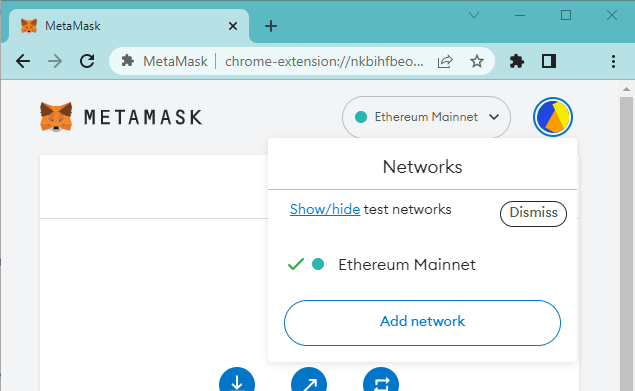
When the MetaMask wallet is installed it comes preconfigured with connection to the Ethereum Mainnet/ Blockchain. All cryptocurrency resides on one or more blockchains and with this connection to the Ethereum chain it means your wallet can send/ receive any cryptocurrency that resides on the Ethereum network.
There are many networks available that you can connect to and it is possible to ‘bridge’ cryptocurrency from one chain to another, but for now it is important to remember that when sending crypto you must ensure that the correct networks are used. For information see our guide on Blockchains & Crypto Mining.

The wallet header displays your default Account name (Account1) and your public key which comes in the form of a 42 character string of numbers and letters: 0xF2fc936d42b03C9a236442E95Eb1E165646D7061
This is the public key to your account. Anyone copying this key into https://etherscan.io/ will be able to view your account balance and transactions. This key does not provide access to conduct transactions.
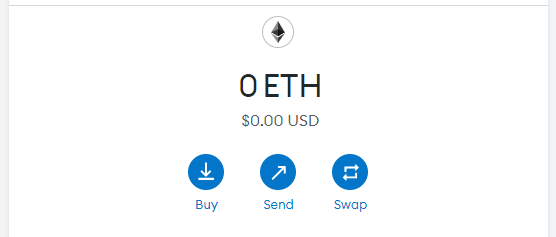
The main body of the wallet displays the account balance. It defaults to Eth – which is the native cryptocurrency for the Ethereum blockchain.
There are options to Buy, Send, Swap cryptocurrency which we will come to later.
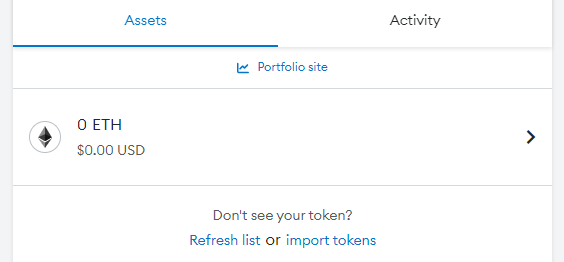
The final section of the wallet is split into two sections: Assets and Activity.
Assets is a list of cryptocurrency assets currently linked to your wallet. Again at wallet creation, the only balance should be a zero amount of Eth.
Activity lists your wallet activity. This will grow as you sign and conduct transactions on the various networks.
Adding A NEW NETWORK
Upon installation the MetaMask wallet is configured with a connection to the Ethereum blockchain. This means that your wallet and send and receive cryptocurrency that reside on the Ethereum network. To send and receive tokens that are native to other blockchains you may need to add the network in the MetaMask wallet.
Adding a new network to your wallet
- Click the button at the top of the Wallet Ethereum Mainnet and then click Add Network.
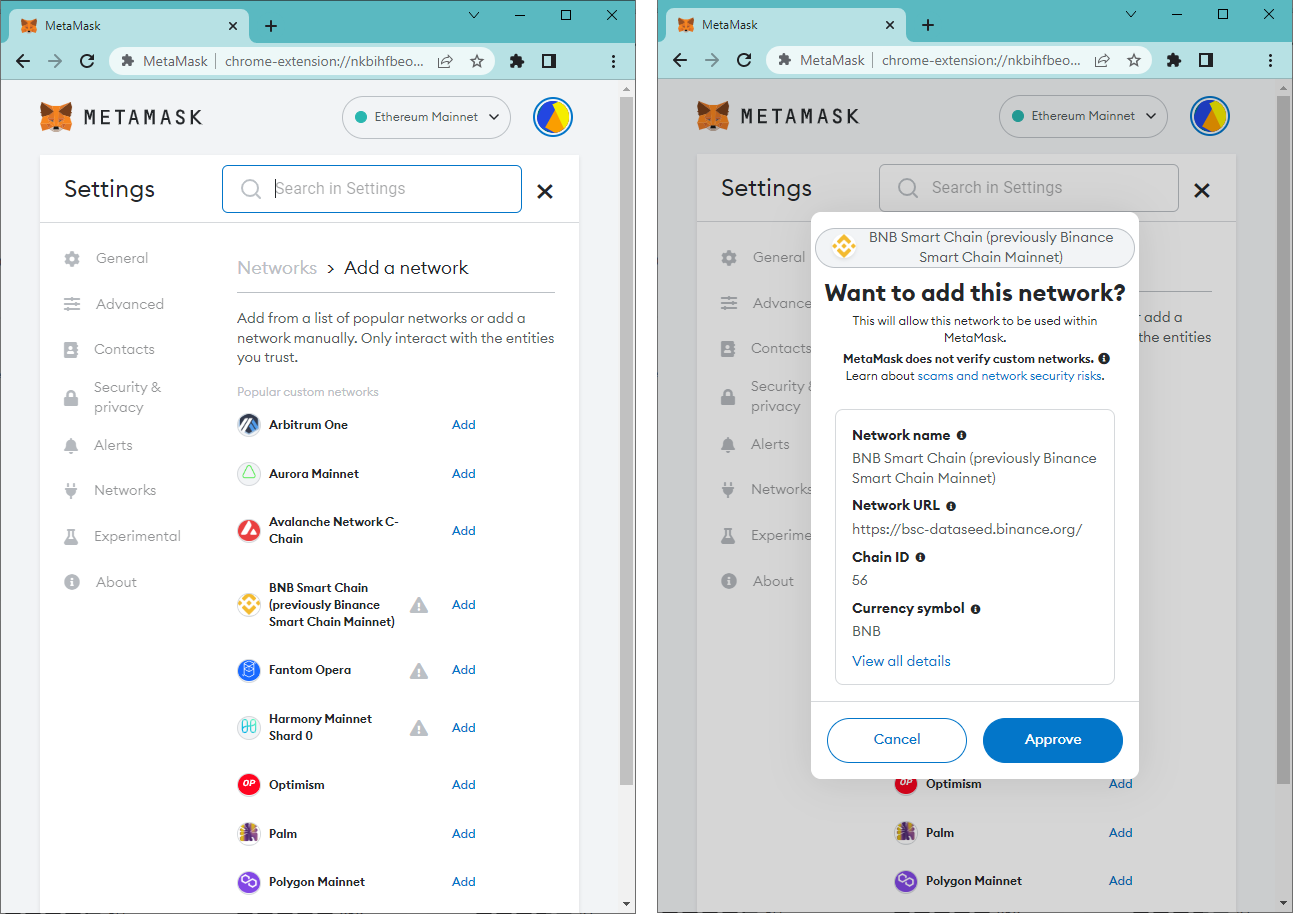
2. A list of networks will be displayed. Click Add against the network you want to add to your wallet. In the example below we will use BNB Smart Chain. You will then be shown a prompt for verification. The verification will show the Network Name, URL, Chain ID, and Currency Symbol. Click Approve to add the network to the wallet.
3. The network will be added to your wallet and clicking Switch will change your MetaMask wallet display from Ethreum chain to the newly added network.
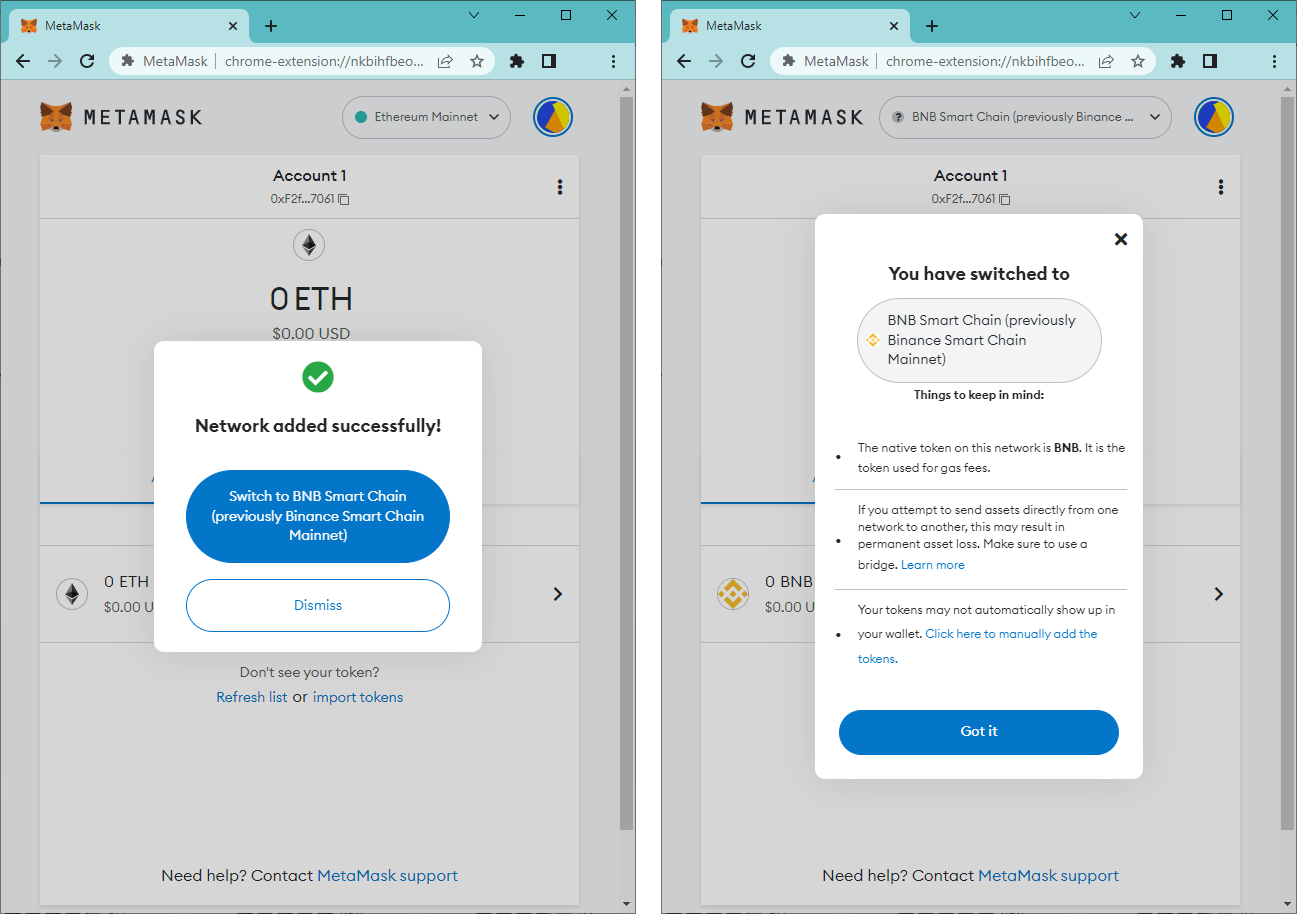
4. After completion your wallet will show the account balance in the native currency for the chain you have just added. In the example below, we added the BNB Smart Chain and the native token for this chain is a token called BNB.

Adding Coins and Tokens to Your Wallet
When cryptocurrency is sent to your wallet the display will be updated with your new account balance. If you receive a type of cryptocurrency that is not currently shown in your wallet then, depending on your settings, you may need to add reference to the new coin manually.
Turning on AutoDetect
- To ensure that new tokens sent to your wallet are displayed automatically you will need to turn on the Autodetection feature in the MetaMask wallet.
- To do this: click your Account header icon > Settings > Security & Privacy and then scroll down to the Autodetect tokens and click the toggle switch to enable.
- When you next receive a type of cryptocurrency that is not already in your MetaMask wallet it will be added automatically.

Adding Tokens Manually
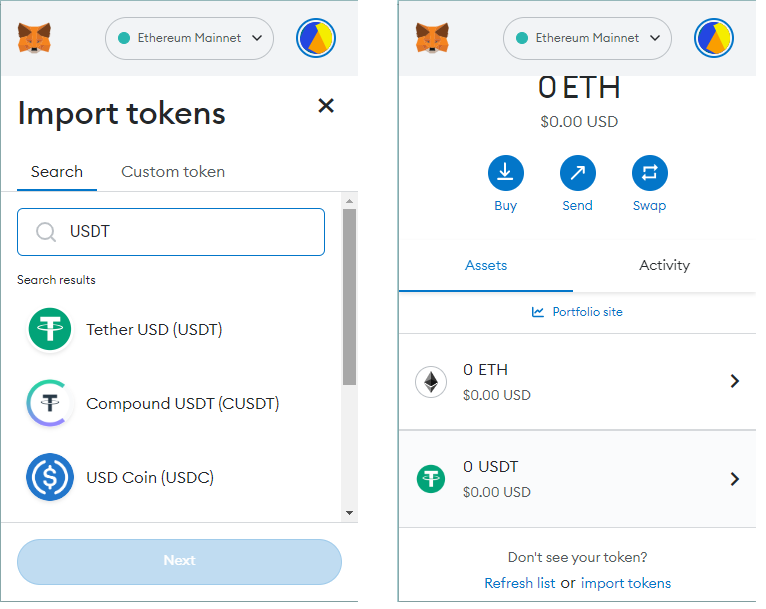
- From the MetaMask wallet click the Import Tokens link. Using the Search field you should be able to search for and select a token from the list. Once added the token will be displayed in your wallet along with your account balance.
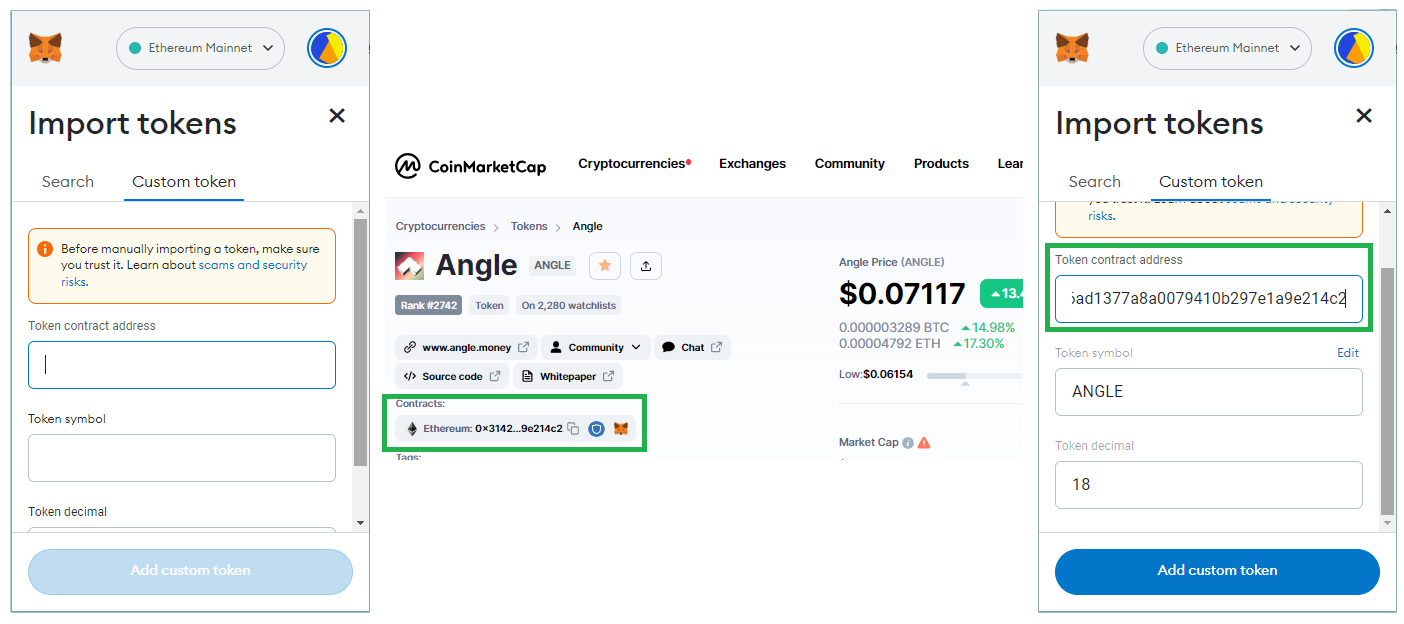
2. If the token you want to add is not listed in the Search then you can add it as a Custom token. Click the Custom Token link. You will need to supply the Token Contract Address and enter this into the appropriate field. Fortunately this is not as difficult as it sounds. Navigate to https://coinmarketcap.com/ and enter the token you want to add into the search bar to find the token’s page. Under Contracts you will see the contract wallet public key address for the token. Copy this using the copy icon and paste it into your Token Contract Address field in your MetaMask wallet (or alternately you can click the MetaMask icon).
The Token Symbol and Token Decimals fields will be populated automatically based on the contract address added. Click Add Custom Token.
3. The new token will now be displayed in your MetaMask wallet along with the token balance.
Sending crypto to your wallet
So now you have an empty wallet we need to send some cryptocurrency to it. Sending and receiving cryptocurrency is often fast, reliable and cheap and can be carried out from an exchange or crypto wallet. In this example we will send cryptocurrency from our Binance account.
Sending crypto to your wallet from an exchange
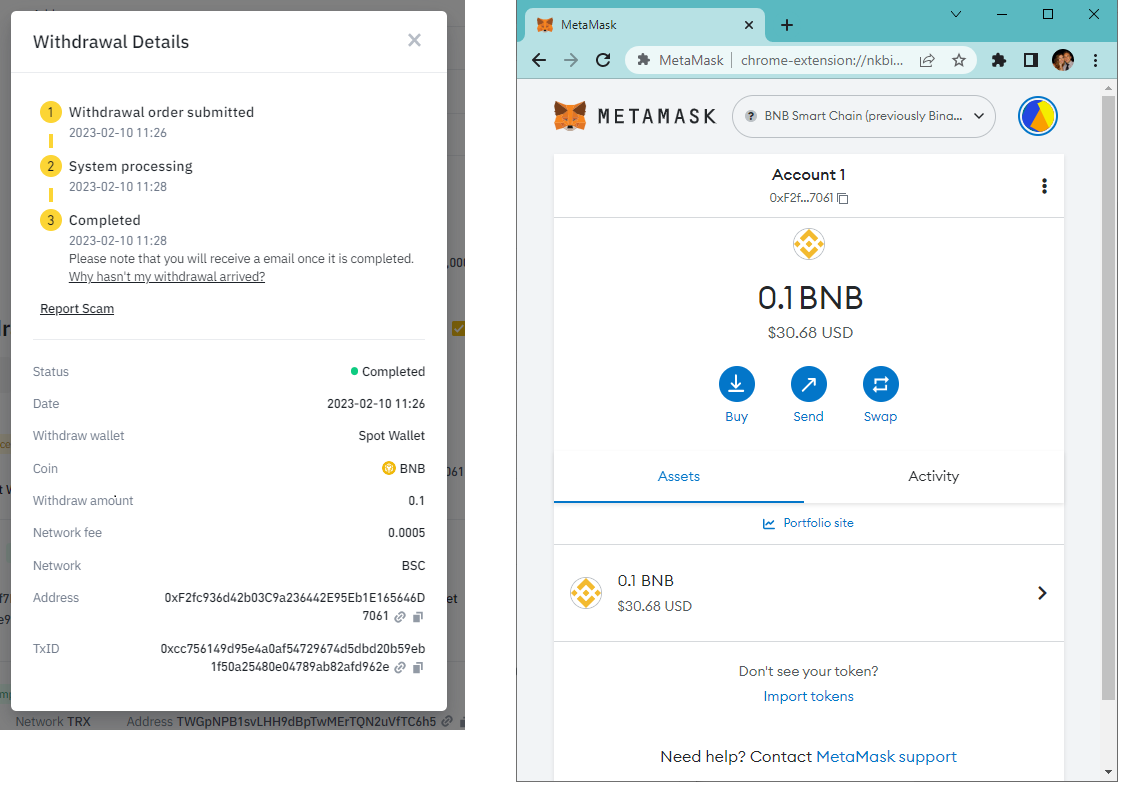
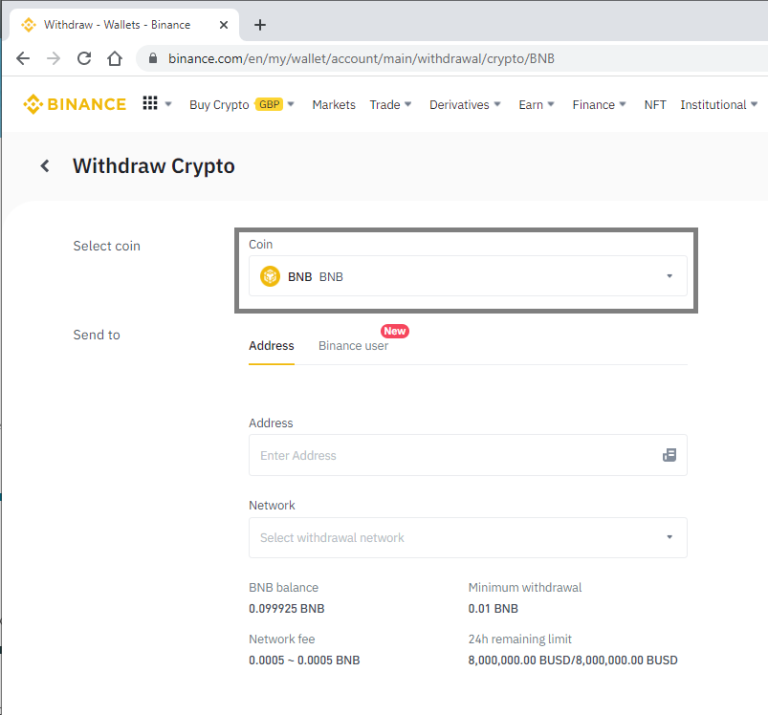
- Log into your exchange from where you want to send your cryptocurrency. Navigate to the Fiat and Spot menu and select Withdraw for the cryptocurrency that you want to send to your wallet.
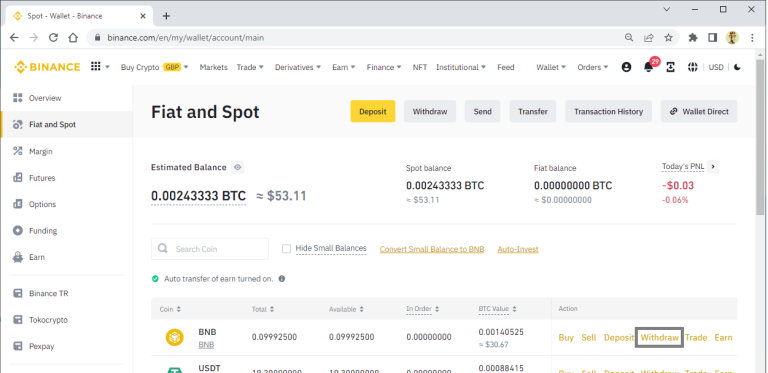
2. The withdrawal page will be displayed. The coin you are going to withdrawal should be displayed in the Coin field, if not you can select it from the dropdown list.
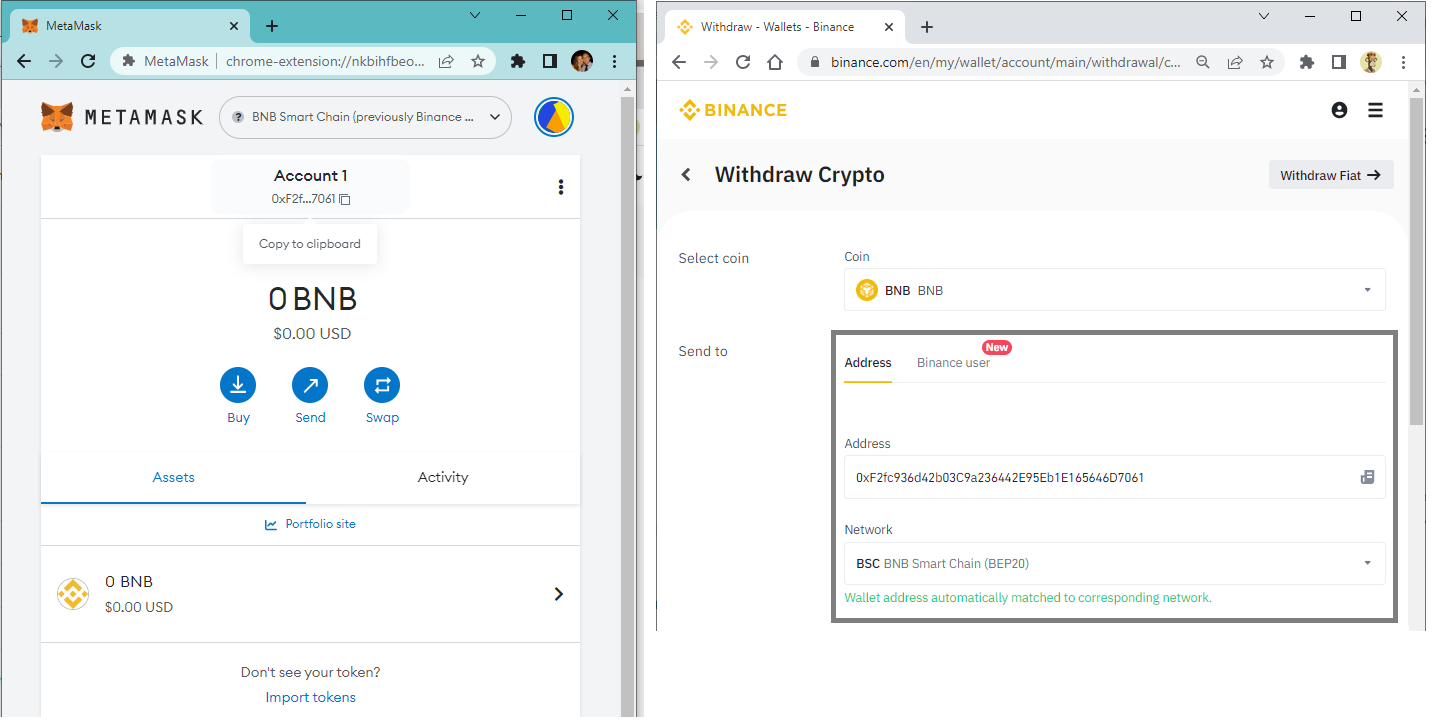
3. Open your MetaMask wallet and copy the wallet address from the top of the wallet display. Paste this into the Address field on the Binance withdrawal page.
4. Once the Address is added, the Network that the crypto will be sent on will be automatically identified based upon the address.
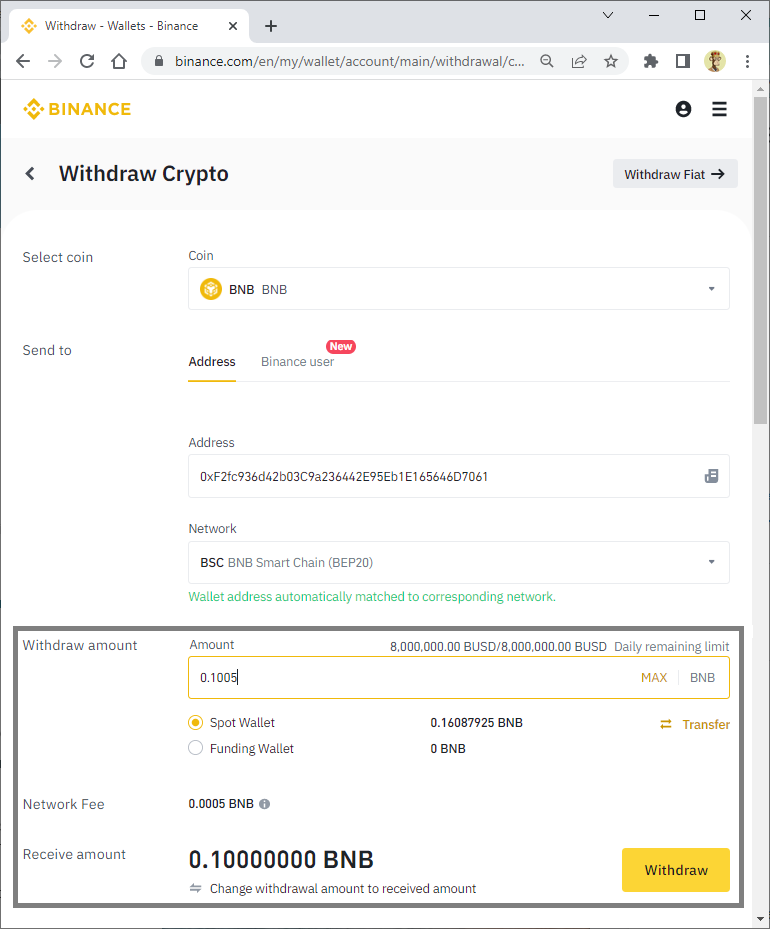
5. The amount of cryptocurrency you have in your Spot Wallet for the selected coin is displayed adjacent to the Spot Wallet label. Enter the Amount you wish to withdraw into the Amount field.
6. Every transaction that takes place on the blockchain requires a network fee for it to be processed. The fee varies depending on the network chosen and typically is in the range of a few pence to a few pounds and is paid in the
cryptocurrency being transferred. For the transaction shown in the screenshot below, we are withdrawing BNB and the transaction fee is 0.0005 BNB (which is about 0.05p)
Note: It is worth noting that the transaction fee is a reward paid to miners for processing the transaction on the blockchain. It is not worked out as a percentage according to the size of the transaction, but is a fixed amount based
on the protocol determined by the network selected.
For more information blockchains and network fees refer to our guide here.
7. Click the Withdraw button to initiate the withdrawal.
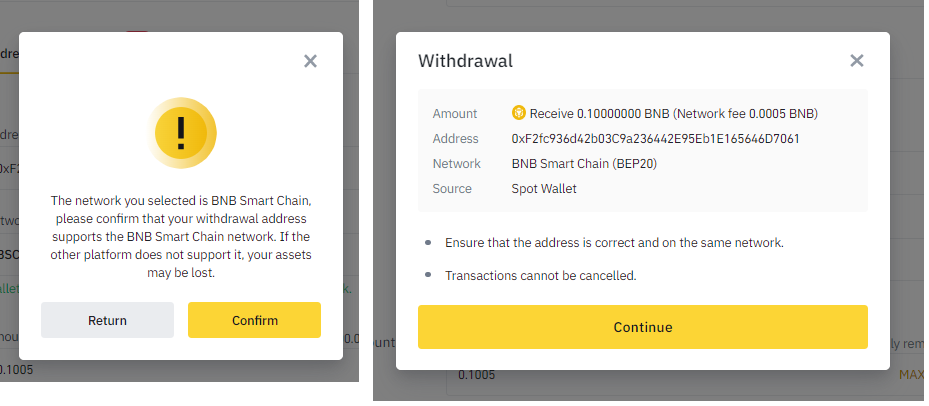
8. Once the withdrawal is initiated you will be presented with a couple of confirmation messages: the first to confirm the network that has been selected. This is important because if you try to send a cryptocurrency on a network that
doesn’t support it then the transaction could be lost.
Once the network chain is confirmed the second message is a confirmation of the transaction, showing the amount, address, and network. Click Continue.
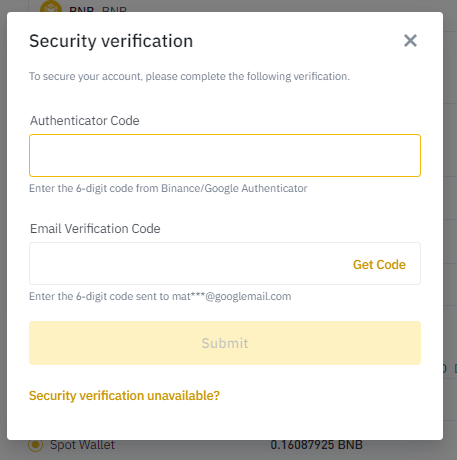
9. Once you have selected Continue, the will be required to pass Security Verification. To do this you will need to supply the Code from your Authenticator App and also the Code sent to your email address when you click the Get Code link. Once you have entered both values, click Submit.
10. The processing of the transaction will now begin. You will be able to see the real-time progress of the transaction as it is processed on the network. For a transaction to be successful it must be confirmed by a number of network nodes. Each chain requires a select number of confirmations, and you can see from screenshot below that the BNB chain requires 15 confirmation before the transaction is completed.
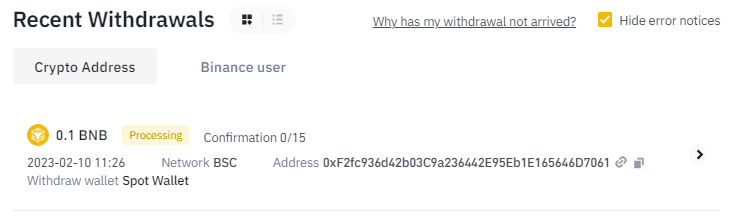
11. Once the required Confirmations count is reached the processing will cease and your transaction status will change to Completed.
Now go back and check your MetaMask wallet and you should see the amount has now increased as the withdrawal from Binance has been received.